Ahhhh… the classic calculator.
This was actually one of the first projects I ever made when I was still new to web development.
Back then, I used HTML, CSS, and JavaScript to build a calculator or, to be honest, I downloaded a source code from a website and studied it. And you know what? That experience helped me a lot.
That’s also one of the main reasons why I decided to create my own source code website. Open-source projects help students learn faster, explore real code, and gain confidence. This time, it’s my turn to give back to the open-source community.
If there’s something you want to build but can’t find anywhere, just drop a comment below. I’ll build it for you.
Alright, let’s dive into the actual project.
Tools You Need
Make sure you have the following installed:
- Visual Studio Code (code editor)
- Node.js (comes with npm)
- Git (optional but recommended)
- A modern browser (Chrome, Edge, Firefox)
app.tsx
import React from "react";
import Calculator from "./components/Calculator";
import "./styles/calculator.css";

export default function App() {
  return (
    <div className="app-wrapper">
      <Calculator />
    </div>
  );
}
App Component Explanation
This file is the main entry component of the React application.
- It imports React to allow JSX syntax.
- It imports the Calculator component from the
componentsfolder. - It imports the calculator styles from the
stylesfolder.
Inside the App function, the <Calculator /> component is rendered inside a wrapper div. This keeps the layout clean and makes the app easier to scale.
Important:
Make sure you create the required folders:
components/for reusable componentsstyles/for CSS files
This structure keeps your project organized and closer to real-world React projects.
Calculator.tsx
import React, { useState } from "react";
import Display from "./Display.tsx";
import Button from "./Button.tsx";
export default function Calculator() {
const [display, setDisplay] = useState("0");
const [prevValue, setPrevValue] = useState<number | null>(null);
const [operator, setOperator] = useState<string | null>(null);
const [overwrite, setOverwrite] = useState(false);
const [history, setHistory] = useState<string[]>([]);
const inputDigit = (digit: string) => {
if (overwrite) {
setDisplay(digit === "." ? "0." : digit);
setOverwrite(false);
return;
}
if (digit === ".") {
if (display.includes(".")) return;
setDisplay(display + ".");
return;
}
if (display === "0") setDisplay(digit);
else setDisplay(display + digit);
};
const compute = (a: number, b: number, op: string) => {
if (op === "+") return a + b;
if (op === "-") return a - b;
if (op === "*") return a * b;
if (op === "/") return b === 0 ? NaN : a / b;
return b;
};
const handleOperator = (op: string) => {
const symbol = op === "x" ? "*" : op;
if (prevValue === null) {
setPrevValue(parseFloat(display));
setOperator(symbol);
setOverwrite(true);
return;
}
if (operator && !overwrite) {
const result = compute(prevValue, parseFloat(display), operator);
setPrevValue(result);
setDisplay(String(result));
setOperator(symbol);
setOverwrite(true);
return;
}
setOperator(symbol);
setOverwrite(true);
};
const handleEqual = () => {
if (!operator || prevValue === null) return;
const result = compute(prevValue, parseFloat(display), operator);
const entry = `${prevValue} ${operator} ${display} = ${result}`;
setHistory((prev) => [entry, ...prev].slice(0, 6));
setDisplay(String(result));
setPrevValue(null);
setOperator(null);
setOverwrite(true);
};
const handleClear = () => {
setDisplay("0");
setPrevValue(null);
setOperator(null);
setOverwrite(false);
};
const handleBackspace = () => {
if (overwrite) {
setDisplay("0");
setOverwrite(false);
return;
}
if (display.length === 1) setDisplay("0");
else setDisplay(display.slice(0, -1));
};
const buttons = [
{ label: "C", action: handleClear },
{ label: "⌫", action: handleBackspace },
{ label: "/", action: () => handleOperator("/") },
{ label: "x", action: () => handleOperator("x") },
{ label: "7", action: () => inputDigit("7") },
{ label: "8", action: () => inputDigit("8") },
{ label: "9", action: () => inputDigit("9") },
{ label: "-", action: () => handleOperator("-") },
{ label: "4", action: () => inputDigit("4") },
{ label: "5", action: () => inputDigit("5") },
{ label: "6", action: () => inputDigit("6") },
{ label: "+", action: () => handleOperator("+") },
{ label: "1", action: () => inputDigit("1") },
{ label: "2", action: () => inputDigit("2") },
{ label: "3", action: () => inputDigit("3") },
{ label: "=", action: handleEqual, tall: true },
{ label: "0", action: () => inputDigit("0"), wide: true },
{ label: ".", action: () => inputDigit(".") },
];
return (
<div className="calculator">
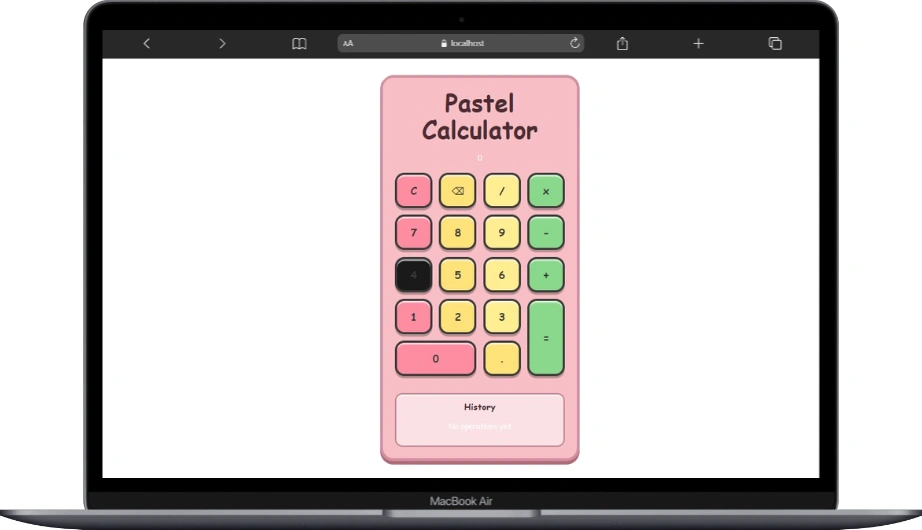
<h1 className="title">Pastel Calculator</h1>
<Display prev={prevValue} operator={operator} value={display} />
<div className="grid">
{buttons.map((b, i) => (
<Button
key={i}
label={b.label}
wide={b.wide}
tall={b.tall}
onClick={b.action}
/>
))}
</div>
<div className="history">
<h3>History</h3>
{history.length === 0 ? (
<p>No operations yet</p>
) : (
history.map((h, i) => <div key={i}>{h}</div>)
)}
</div>
</div>
);
}
This file contains the main logic of the calculator.
- It uses
useStateto manage the display value, previous number, selected operator, and calculation history. - The
inputDigitfunction handles number and decimal input. - The
computefunction performs basic math operations. - Operator, equal, clear, and backspace actions are separated into small, readable functions.
- Calculator buttons are generated from an array, making the UI easier to maintain.
- The
DisplayandButtoncomponents are imported to keep the code modular and clean.
This structure helps beginners understand state management, event handling, and component-based design in React.
Display.tsx
import React from "react";

interface Props {
  prev: number | null;
  operator: string | null;
  value: string;
}

export default function Display({ prev, operator, value }: Props) {
  return (
    <div className="calc-display">
      <div className="calc-prev">
        {prev !== null && operator ? `${prev} ${operator}` : ""}
      </div>
      <div className="calc-value">{value}</div>
    </div>
  );
}
This component is responsible for showing the calculator’s output.
- It receives data using props: the previous value, the selected operator, and the current display value.
- A TypeScript
interfaceis used to define the expected prop types, making the component safer and easier to understand. - The previous value and operator are shown only when they exist.
- The current value is always displayed clearly.
This separation keeps the calculator clean, reusable, and easy to maintain.
Button.tsx
import React from "react";

interface Props {
  label: string;
  wide?: boolean;
  tall?: boolean;
  onClick: () => void;
}

export default function Button({ label, wide, tall, onClick }: Props) {
  return (
    <button
      className={`calc-btn ${wide ? "wide" : ""} ${tall ? "tall" : ""}`}
      onClick={onClick}
    >
      {label}
    </button>
  );
}
This component represents a single calculator button.
- It receives the button text, size options, and click handler through props.
- Optional
wideandtallprops control the button’s layout using CSS classes. - The
onClickfunction triggers the calculator logic when the button is pressed.
By reusing this component, the calculator stays clean, consistent, and easy to extend without duplicating code.
calculator.css
/* Center the entire calculator in the middle of the screen */
body {
  margin: 0;
  padding: 0;
  height: 100vh;

  display: flex;
  justify-content: center;
  align-items: center;

  background: #f7f7f7; /* or your preferred background */
  font-family: "Comic Sans MS", "Poppins", sans-serif;
}

/* === Overall Calculator Container === */
.calculator {
  width: 360px;
  margin: 40px auto;
  padding: 25px;
  border-radius: 28px;

  background: #f8bfc6;  /* pink body */
  border: 6px solid #d28fa1;

  box-shadow: 0 8px 0 #b06b79, 0 12px 25px rgba(0,0,0,0.25);

  display: flex;
  flex-direction: column;
  gap: 20px;
  text-align: center;
  font-family: "Comic Sans MS", "Poppins", sans-serif;
}

.title {
  color: #4a2c32;
  font-weight: 900;
  margin: 0;
}

/* === Display === */
.display {
  height: 85px;
  padding: 15px;
  border-radius: 18px;

  background: #c2f1c2; /* green display */
  border: 5px solid #4e4e4e;

  color: #2b2b2b;
  font-size: 2.3rem;
  font-weight: 700;

  display: flex;
  justify-content: flex-end;
  align-items: center;

  box-shadow: inset 0 6px 0 rgba(255,255,255,0.7),
              inset 0 -6px 0 rgba(0,0,0,0.15);
}

/* === Button Grid === */
.grid {
  display: grid;
  grid-template-columns: repeat(4, 1fr);
  gap: 14px;
}

/* === Buttons === */
button {
  padding: 18px;
  font-size: 1.4rem;
  font-weight: 700;
  border-radius: 20px;

  border: 5px solid #3b3b3b; /* thick cartoon outline */

  cursor: pointer;
  transition: 0.15s ease;

  color: #3b3b3b;

  box-shadow:
    0 5px 0 #00000040,
    inset 0 4px 0 rgba(255,255,255,0.6);
}

/* === Color Groups (Like sample image) === */
button:nth-child(1),   /* C */
button:nth-child(5),
button:nth-child(13),
button:nth-child(17) {
  background: #ff8da1; /* pink */
}

button:nth-child(2),
button:nth-child(6),
button:nth-child(10),
button:nth-child(14),
button:nth-child(18) {
  background: #ffe27a; /* yellow */
}

button:nth-child(3),
button:nth-child(7),
button:nth-child(11),
button:nth-child(15) {
  background: #ffee92; /* lighter yellow */
}

button:nth-child(4),
button:nth-child(8),
button:nth-child(12),
button:nth-child(16) {
  background: #89d88c; /* green */
}

/* Equals Button (Tall like reference) */
button[name="="],
button.equal {
  background: #ff8b3d !important;
  grid-row: span 2;
}

/* Wide buttons (like "0") */
.wide {
  grid-column: span 2;
}

/* Tall buttons */
.tall {
  grid-row: span 2;
}

/* === Button Press Effect === */
button:active {
  transform: translateY(4px);
  box-shadow: inset 0 4px 0 rgba(0,0,0,0.25);
}

/* === History Section === */
.history {
  margin-top: 15px;
  background: #fbe1e6;
  padding: 12px;
  border-radius: 16px;
  border: 3px solid #c28a94;
  box-shadow: inset 0 4px 0 rgba(255,255,255,0.5);
}

.history h3 {
  margin: 0;
  color: #4a2c32;
  font-weight: 700;
}
Even a simple calculator can teach powerful concepts in React when combined with clean styling and component-based structure. Small projects like this build confidence and real-world problem-solving skills. If you want to master React from fundamentals to advanced concepts, learn how to structure components properly, and build projects the way real developers do, enroll in my React course and start leveling up your skills today.
One response
Woaah thanks po! Pa request sana quiz app din