Why I Built This Weather App Using a Mock API (Beginner-Friendly Approach)
Most weather app projects today rely on real APIs and are commonly built using frameworks such as React.js. While this approach is powerful, it can be overwhelming for beginners who are still learning the fundamentals of JavaScript, APIs, and frontend development.
For this project, I intentionally chose to use a mock API to create a beginner-friendly learning experience.
An API (Application Programming Interface) allows different applications to communicate with each other. In simple terms, it lets your app request data such as weather information and receive a structured response, usually in JSON format. Real APIs often require API keys, authentication, request limits, and complex error handling, which can easily confuse beginners.
To simplify the learning process, I created a mock weather API that simulates real-world API responses. This allows beginners to clearly understand how API data is structured, how JavaScript consumes that data, and how the user interface updates dynamically based on user input. By starting with a mock API, you can focus on core concepts such as data handling, DOM manipulation, and UI rendering without unnecessary distractions.
This approach helps build confidence and a strong foundation. Once you transition to a real API, the concepts will already feel familiar, making the learning curve much smoother and less intimidating.
If you want to deepen your knowledge of APIs, JavaScript, and frontend development, I encourage you to join my mentorship program to gain real world experience.
You can also visit my website to download open-source frontend projects, tutorials, and learning resources. I am always happy to help and support aspiring developers on their learning journey.
With that said, let’s move on to the actual code and start building the weather app step by step.
index.html
<!DOCTYPE html>
<html lang="en">
<head>
<meta charset="UTF-8" />
<meta name="viewport" content="width=device-width, initial-scale=1.0"/>
<title>Mock Weather App</title>
<link rel="stylesheet" href="style.css" />
<script src="https://code.jquery.com/jquery-3.7.1.min.js"></script>
</head>
<body>
<div class="app">
<aside class="sidebar">
<div class="logo"></div>
<ul>
<li class="active">Weather</li>
<li>Cities</li>
<li>Map</li>
<li>Settings</li>
</ul>
</aside>
<main class="content">
<input type="text" id="search" placeholder="Search city and press Enter" />
<section class="current">
<div class="current-info">
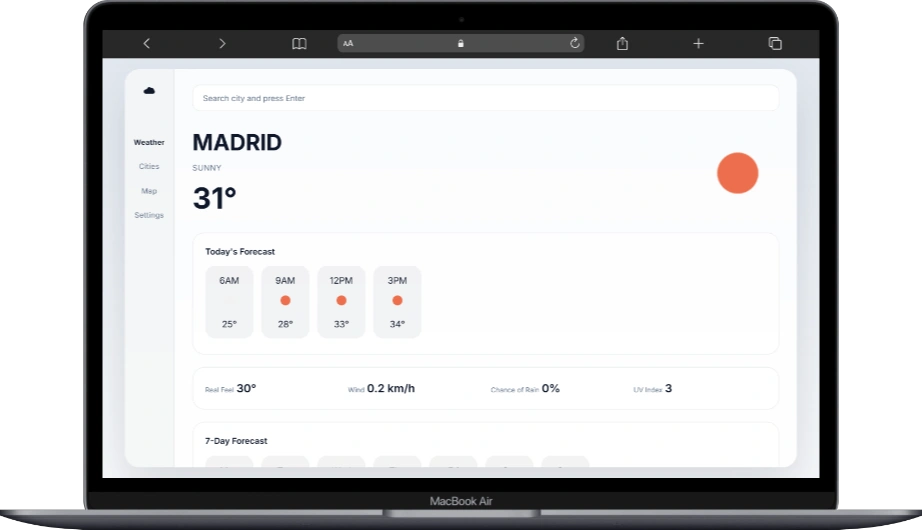
<h1 id="city">MADRID</h1>
<p id="condition">Sunny</p>
<h2 id="temp">31°</h2>
</div>
<img id="mainIcon" alt="Weather Icon" />
</section>
<section class="hourly">
<h3>Today's Forecast</h3>
<div id="hours" class="scroll-x"></div>
</section>
<section class="details">
<div>
<span class="label">Real Feel</span>
<span id="realFeel" class="value">30°</span>
</div>
<div>
<span class="label">Wind</span>
<span id="wind" class="value">0.2 km/h</span>
</div>
<div>
<span class="label">Chance of Rain</span>
<span id="rain" class="value">0%</span>
</div>
<div>
<span class="label">UV Index</span>
<span id="uv" class="value">3</span>
</div>
</section>
<section class="weekly">
<h3>7-Day Forecast</h3>
<div id="week" class="scroll-x"></div>
</section>
</main>
</div>
<script src="script.js"></script>
</body>
</html>
This HTML file serves as the main structure of the Mock Weather App. It defines the layout and placeholders where weather data will be dynamically displayed using JavaScript and jQuery.
The document starts with the standard <!DOCTYPE html> declaration and sets the language to English. Inside the <head> section, essential meta tags are included for proper character encoding and responsive behavior on different screen sizes. The external CSS file (style.css) is linked to handle styling, and the jQuery library is loaded to simplify DOM manipulation and event handling.
The main application layout is wrapped inside a div with the class app. This container holds two primary sections: the sidebar and the main content area.
The sidebar (aside.sidebar) contains a simple navigation layout with a logo and menu items such as Weather, Cities, Map, and Settings. This section is mainly for visual structure and can be extended later with additional features.
The main content area (main.content) includes:
- A search input field where users can type a city name and press Enter to fetch weather data.
- A current weather section that displays the city name, weather condition, temperature, and a dynamic weather icon.
- An hourly forecast section that shows today’s weather breakdown in a horizontal scroll layout.
- A weather details section that displays additional information such as real feel temperature, wind speed, chance of rain, and UV index.
- A weekly forecast section that presents a seven-day weather outlook.
Each dynamic element uses unique id attributes, allowing JavaScript to update the content in real time based on the selected city. The script.js file is loaded at the bottom of the page to ensure the HTML elements are fully rendered before the JavaScript logic runs.
Overall, this HTML file provides a clean, semantic structure that separates layout, styling, and functionality, making the project easy to maintain and extend.
script.js
const ICONS = {
  sunny: "https://openweathermap.org/img/wn/01d@2x.png",
  partly: "https://openweathermap.org/img/wn/02d@2x.png",
  cloudy: "https://openweathermap.org/img/wn/03d@2x.png",
  rain: "https://openweathermap.org/img/wn/09d@2x.png",
  storm: "https://openweathermap.org/img/wn/11d@2x.png"
};

const mockWeather = {
  madrid: {
    temp: 31,
    condition: "Sunny",
    icon: ICONS.sunny,
    realFeel: 30,
    wind: "0.2 km/h",
    rain: "0%",
    uv: 3,
    hourly: [
      { time: "6AM", temp: 25, icon: ICONS.cloudy },
      { time: "9AM", temp: 28, icon: ICONS.sunny },
      { time: "12PM", temp: 33, icon: ICONS.sunny },
      { time: "3PM", temp: 34, icon: ICONS.sunny }
    ],
    weekly: [
      { day: "Mon", temp: "36/22", icon: ICONS.sunny },
      { day: "Tue", temp: "37/21", icon: ICONS.sunny },
      { day: "Wed", temp: "37/21", icon: ICONS.sunny },
      { day: "Thu", temp: "37/21", icon: ICONS.cloudy },
      { day: "Fri", temp: "37/21", icon: ICONS.cloudy },
      { day: "Sat", temp: "37/21", icon: ICONS.rain },
      { day: "Sun", temp: "37/21", icon: ICONS.storm }
    ]
  },

  manila: {
    temp: 29,
    condition: "Cloudy",
    icon: ICONS.cloudy,
    realFeel: 33,
    wind: "3 km/h",
    rain: "40%",
    uv: 6,
    hourly: [
      { time: "6AM", temp: 26, icon: ICONS.cloudy },
      { time: "9AM", temp: 28, icon: ICONS.partly },
      { time: "12PM", temp: 30, icon: ICONS.partly },
      { time: "3PM", temp: 31, icon: ICONS.rain }
    ],
    weekly: [
      { day: "Mon", temp: "30/25", icon: ICONS.rain },
      { day: "Tue", temp: "31/25", icon: ICONS.cloudy },
      { day: "Wed", temp: "32/26", icon: ICONS.sunny }
    ]
  }
};

function updateUI(city, data) {
  $("#city").text(city.toUpperCase());
  $("#condition").text(data.condition);
  $("#temp").text(data.temp + "°");
  $("#mainIcon").attr("src", data.icon);

  $("#realFeel").text(data.realFeel + "°");
  $("#wind").text(data.wind);
  $("#rain").text(data.rain);
  $("#uv").text(data.uv);

  $("#hours").html("");
  data.hourly.forEach(h => {
    $("#hours").append(`
      <div class="hour">
        <p>${h.time}</p>
        <img src="${h.icon}">
        <p>${h.temp}°</p>
      </div>
    `);
  });

  $("#week").html("");
  data.weekly.forEach(d => {
    $("#week").append(`
      <div class="day">
        <p>${d.day}</p>
        <img src="${d.icon}">
        <p>${d.temp}</p>
      </div>
    `);
  });
}

$("#search").on("keyup", function(e) {
  if (e.key === "Enter") {
    const city = $(this).val().toLowerCase();
    if (mockWeather[city]) {
      updateUI(city, mockWeather[city]);
    } else {
      alert("City not found (mock data only)");
    }
  }
});

updateUI("madrid", mockWeather.madrid);
Weather Icon Mapping
const ICONS = {
  sunny: "...",
  partly: "...",
  cloudy: "...",
  rain: "...",
  storm: "..."
};
The ICONS object acts as a centralized icon map. Each weather condition is linked to an online image URL. This approach avoids hardcoding image links throughout the code and makes it easier to update or replace icons in one place.
Mock Weather Data
const mockWeather = { ... };
The mockWeather object simulates a real weather API response. Each city (such as madrid and manila) contains structured weather data, including:
- Current temperature and condition
- Weather icon reference
- Real feel temperature
- Wind speed, rain chance, and UV index
- Hourly forecast data
- Weekly forecast data
This structure closely resembles real API responses, making it ideal for learning and practice.
Updating the User Interface
function updateUI(city, data) { ... }
The updateUI function is responsible for updating all visible elements in the app. It:
- Updates the city name, temperature, condition, and main weather icon
- Updates additional weather details such as wind, rain, and UV index
- Dynamically generates the hourly forecast cards
- Dynamically generates the weekly forecast cards
Using a single function to handle all UI updates keeps the code clean and maintainable.
Handling City Search
$("#search").on("keyup", function(e) { ... });
This event listener waits for the user to press the Enter key in the search input field. When triggered:
- The input value is converted to lowercase
- The app checks if the city exists in the mock weather data
- If found, the UI is updated with the corresponding weather information
- If not found, an alert message is displayed
This simulates how a real API request would behave when a city is not available.
Default Data Load
updateUI("madrid", mockWeather.madrid);
This line ensures that the app displays default weather data when the page first loads, providing users with immediate content instead of an empty interface.
style.css
@import url("https://fonts.googleapis.com/css2?family=Inter:wght@300;400;500;600;700&display=swap");

:root {
  --bg-body: #f1f5f9;
  --bg-app: rgba(255, 255, 255, 0.85);
  --bg-card: rgba(255, 255, 255, 0.7);
  --bg-soft: rgba(15, 23, 42, 0.05);

  --text-main: #0f172a;
  --text-muted: #64748b;

  --border-soft: rgba(15, 23, 42, 0.08);
  --accent: #f97316;
}

* {
  margin: 0;
  padding: 0;
  box-sizing: border-box;
  font-family: "Inter", system-ui, -apple-system, sans-serif;
}

body {
  min-height: 100vh;
  background: linear-gradient(180deg, #e2e8f0, #f8fafc);
  display: flex;
  justify-content: center;
  align-items: center;
  color: var(--text-main);
  line-height: 1.5;
}

/* APP */
.app {
  width: 100%;
  max-width: 1200px;
  height: 95vh;
  background: var(--bg-app);
  backdrop-filter: blur(20px);
  border-radius: 26px;
  display: flex;
  overflow: hidden;
  box-shadow: 0 40px 80px rgba(15, 23, 42, 0.15);
}

/* SIDEBAR */
.sidebar {
  width: 88px;
  background: rgba(15, 23, 42, 0.03);
  padding-top: 24px;
  text-align: center;
  border-right: 1px solid var(--border-soft);
}

.logo {
  font-size: 22px;
  font-weight: 600;
}

.sidebar ul {
  list-style: none;
  margin-top: 64px;
}

.sidebar li {
  margin: 24px 0;
  font-size: 13px;
  letter-spacing: 0.3px;
  color: var(--text-muted);
  transition: color 0.2s ease;
}

.sidebar li.active {
  color: var(--text-main);
  font-weight: 600;
}

/* CONTENT */
.content {
  flex: 1;
  padding: 28px 32px;
  overflow-y: auto;
}

/* SEARCH */
#search {
  width: 100%;
  padding: 14px 18px;
  border-radius: 14px;
  border: 1px solid var(--border-soft);
  background: rgba(255, 255, 255, 0.9);
  color: var(--text-main);
  font-size: 14px;
  margin-bottom: 26px;
  outline: none;
}

#search::placeholder {
  color: var(--text-muted);
}

/* CURRENT WEATHER */
.current {
  display: flex;
  justify-content: space-between;
  align-items: center;
  gap: 24px;
}

.current-info h1 {
  font-size: clamp(26px, 3.8vw, 40px);
  font-weight: 700;
  letter-spacing: -0.4px;
}

.current-info p {
  margin-top: 4px;
  font-size: 14px;
  color: var(--text-muted);
  text-transform: uppercase;
  letter-spacing: 0.4px;
}

.current-info h2 {
  margin-top: 6px;
  font-size: clamp(38px, 5vw, 52px);
  font-weight: 700;
}

.current img {
  width: clamp(90px, 14vw, 150px);
}

/* CARDS */
.hourly,
.details,
.weekly {
  margin-top: 22px;
  background: var(--bg-card);
  border-radius: 22px;
  padding: 22px;
  border: 1px solid var(--border-soft);
}

/* SECTION TITLES */
.hourly h3,
.weekly h3 {
  font-size: 15px;
  font-weight: 600;
  margin-bottom: 14px;
}

/* SCROLL */
.scroll-x {
  display: flex;
  gap: 14px;
  overflow-x: auto;
  padding-bottom: 6px;
}

/* HOURLY / DAY ITEMS */
.hour,
.day {
  min-width: 86px;
  background: var(--bg-soft);
  border-radius: 18px;
  padding: 14px 10px;
  text-align: center;
  flex-shrink: 0;
}

.hour span,
.day span {
  display: block;
  font-size: 12px;
  color: var(--text-muted);
  margin-bottom: 6px;
}

.hour strong,
.day strong {
  font-size: 15px;
  font-weight: 600;
}

.hour img,
.day img {
  width: 36px;
  margin: 6px 0;
}

/* DETAILS */
.details {
  display: grid;
  grid-template-columns: repeat(auto-fit, minmax(160px, 1fr));
  gap: 18px;
}

.detail-item {
  background: var(--bg-soft);
  border-radius: 16px;
  padding: 14px 16px;
}

.label {
  font-size: 12px;
  color: var(--text-muted);
}

.value {
  margin-top: 4px;
  font-size: 20px;
  font-weight: 600;
}

/* MOBILE */
@media (max-width: 768px) {
  .sidebar {
    display: none;
  }

  .app {
    height: 100vh;
    border-radius: 0;
  }

  .content {
    padding: 22px 18px;
  }

  .current {
    flex-direction: column;
    text-align: center;
  }
}
If you want to move beyond being a basic or “vibe” coder, now is the time to strengthen your fundamentals and build real technical depth. Developers who understand APIs, data flow, and application logic while effectively using AI to accelerate their workflow are far more valuable in today’s job market.
By mastering core frontend concepts and learning how to leverage AI as a productivity tool, you position yourself for faster career growth, higher-impact contributions, and long-term success as a software developer. These are the skills that help you stand out, perform better in real-world projects, and stay competitive when you land your first or next job.
2 Responses
Pa request din po ng snake game tutorial using JS . Thanks po!
hi! Yes sure we will make snake game tutorial using JS. Stay tune!